Table of contents
- Prerequisites
- Namespace Creation and Installation
- Understanding Key Components
- Checking the Admin Password
- Accessing the UI
- CLI Installation
- CLI Login
- Current State
Prerequisites
To install ArgoCD, you obviously need a Kubernetes cluster. It doesn’t matter whether it’s a production environment or a local lab setup. If you want to try it out locally, minikube, kind, or Docker Desktop all work.
This guide assumes kubectl is already installed and connected to a cluster. Verification is straightforward.
kubectl cluster-infoIf cluster information is displayed, you’re good to go. If the connection isn’t working, you’ll need to configure your kubeconfig first — refer to the documentation for your specific cluster.
Namespace Creation and Installation
It’s conventional to install ArgoCD in a dedicated namespace. Using the name argocd is standard, and the official documentation is written with this name in mind.
Create the namespace and install ArgoCD.
kubectl create namespace argocd
kubectl apply -n argocd -f https://raw.githubusercontent.com/argoproj/argo-cd/stable/manifests/install.yaml
The first command creates the namespace, and the second installs all ArgoCD components at once. Since it fetches the manifest directly from the stable branch of the official repository, you always get the latest stable version.
Once the installation is complete, let’s check what resources were created.
kubectl get all -n argocdYou’ll see a list of Deployments, Services, Pods, and more. Wait until all Pods reach Running status. This usually takes 1–2 minutes.
kubectl wait --for=condition=Ready pod --all -n argocd --timeout=120sThis command waits up to 120 seconds for all Pods to become Ready. It’s a cleaner approach than staring blankly at the terminal.
Understanding Key Components
Looking at the list of installed Pods, you’ll see several running. Knowing what each one does helps when troubleshooting.
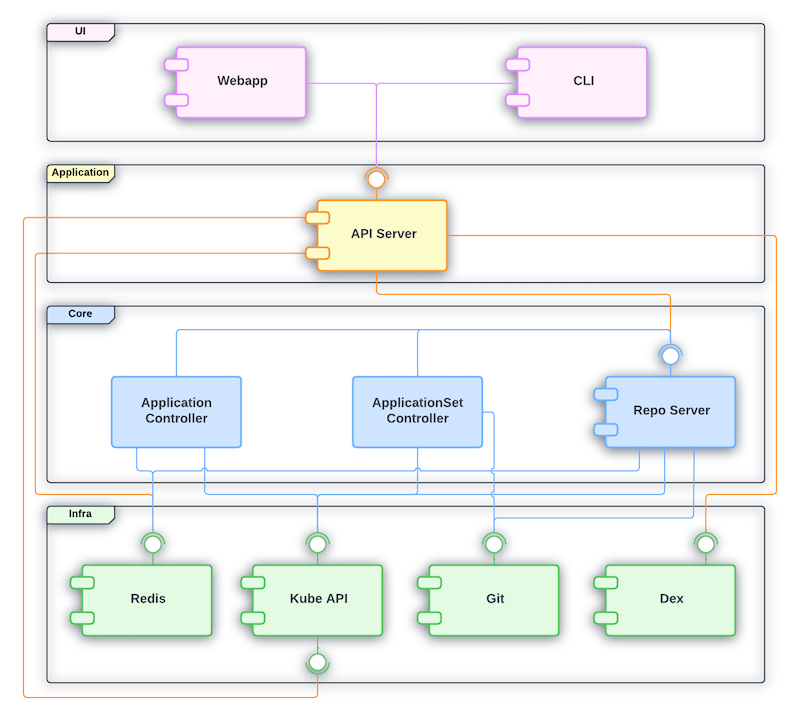
Source: ArgoCD official repository — Apache 2.0 License
Let’s first look at the overall structure of how ArgoCD’s main components connect to each other.
flowchart TB
    User["User (UI / CLI)"]
    APIServer["argocd-server\n(API Server + Web UI)"]
    Dex["argocd-dex-server\n(SSO Authentication)"]
    RepoServer["argocd-repo-server\n(Git Clone + Manifest Rendering)"]
    Controller["argocd-application-controller\n(Sync + State Comparison)"]
    Redis["argocd-redis\n(Cache)"]
    Git["Git Repository"]
    K8s["Kubernetes Cluster"]

    User -->|"Login / Sync Request"| APIServer
    APIServer -->|"Delegate Authentication"| Dex
    APIServer -->|"Manifest Request"| RepoServer
    APIServer -->|"Cache Read/Write"| Redis
    RepoServer -->|"clone & render\n(Helm, Kustomize, etc.)"| Git
    RepoServer -->|"Cache Store"| Redis
    Controller -->|"Query Rendered Manifests"| RepoServer
    Controller -->|"Compare Actual State & Sync"| K8s
    Controller -->|"Cache Read/Write"| Redis
kubectl get pods -n argocdThe output looks something like this.
argocd-application-controller-0       1/1     Running   0          2m
argocd-dex-server-xxx                 1/1     Running   0          2m
argocd-redis-xxx                      1/1     Running   0          2m
argocd-repo-server-xxx                1/1     Running   0          2m
argocd-server-xxx 1/1 Running 0 2m- argocd-server: The core component that serves as both the API server and the web UI. This is what users directly interact with
- argocd-application-controller: The controller that actually compares Git and cluster state and performs synchronization
- argocd-repo-server: Responsible for cloning Git repos and rendering manifests. Helm chart and Kustomize processing happen here
- argocd-redis: Cache storage. Used for sharing data between components
- argocd-dex-server: Handles SSO (Single Sign-On) authentication. If you don’t need external authentication integration, you don’t need to worry about it much
Checking the Admin Password
When ArgoCD is first installed, an initial password for the admin account is automatically generated. This password is stored in a Kubernetes Secret.
kubectl -n argocd get secret argocd-initial-admin-secret -o jsonpath="{.data.password}" | base64 -dThe string that appears is the initial password. Copy it.
This Secret is intended for initial setup, so once you’ve logged in and changed the password, it’s safe to delete it. The official documentation also recommends deleting it after the password change for security.
# Run after changing the password
kubectl -n argocd delete secret argocd-initial-admin-secret
Accessing the UI
The ArgoCD web UI looks like this. Application cards are displayed at a glance, and you can see the sync status and health status directly on each card.
Source: ArgoCD official repository — Apache 2.0 License
The ArgoCD server is created as a ClusterIP type Service by default. To access it from outside the cluster, you need a workaround. The fastest approach in a local environment is port-forward.
kubectl port-forward svc/argocd-server -n argocd 8080:443Now you can access https://localhost:8080 in your browser. Since it uses a self-signed certificate, the browser will show a security warning — in a local environment, just ignore it and proceed.
When the login screen appears, use the credentials you found above.
- Username:
admin - Password: the initial password you copied above
In production environments, it’s common to set up an Ingress instead of port-forward. If you’re using Nginx Ingress Controller or Traefik, create an Ingress resource to connect it.
apiVersion: networking.k8s.io/v1
kind: Ingress
metadata:
  name: argocd-server-ingress
  namespace: argocd
  annotations:
    nginx.ingress.kubernetes.io/ssl-passthrough: "true"
    nginx.ingress.kubernetes.io/backend-protocol: "HTTPS"
spec:
  ingressClassName: nginx
  rules:
    - host: argocd.example.com
      http:
        paths:
          - path: /
            pathType: Prefix
            backend:
              service:
                name: argocd-server
                port:
                  number: 443
The reason for using ssl-passthrough is that the ArgoCD server handles TLS on its own. If you want to terminate TLS at the Ingress instead, you’ll need to add the --insecure flag to the ArgoCD server — refer to the official documentation for details.
CLI Installation
While most tasks can be done through the web UI, having the CLI is useful for scripting automation and quick operations.
On macOS, you can install it easily with Homebrew.
brew install argocdOn Linux, download the binary directly.
curl -sSL -o argocd-linux-amd64 https://github.com/argoproj/argo-cd/releases/latest/download/argocd-linux-amd64
sudo install -m 555 argocd-linux-amd64 /usr/local/bin/argocd
rm argocd-linux-amd64
Verify the installation by checking the version.
argocd version --clientCLI Login
Once the CLI is installed, log in to the ArgoCD server. Port-forward must be running for this to work.
argocd login localhost:8080When the self-signed certificate warning appears, press y to accept, then enter the admin account and initial password.
After a successful login, change the password right away.
argocd account update-passwordYou’ll be prompted to enter the current password and a new password. Once the change is complete, you can delete the initial password Secret as mentioned earlier.
To verify the CLI is working properly, query the cluster list.
argocd cluster listThe cluster where ArgoCD is installed should be registered by default. It will appear with the https://kubernetes.default.svc address, which is ArgoCD recognizing the cluster it’s running on as in-cluster.
Current State
Installation and initial setup are complete. Here’s a summary of where things stand:
- ArgoCD is installed in the
argocdnamespace - The web UI is accessible at
https://localhost:8080 - CLI login is complete, password has been changed
- No Applications are registered yet — seeing an empty dashboard is expected
In the next part, we’ll register the first Application on this empty dashboard. We’ll connect a Git repo, examine the Application CRD structure, and practice manual sync vs automatic sync.


Loading comments...