Table of contents
- 프로젝트 설정
- 서버 인스턴스와 헬퍼
- Tool 등록 — get_alerts, get_forecast
- stdio 트랜스포트로 실행
- Inspector로 동작 확인
- Claude Desktop에 연결
- 한 사이클의 완성
프로젝트 설정
Node.js 16 이상이 깔려 있어야 한다. 새 폴더를 만들고 의존성을 깐다.
mkdir weather && cd weather
npm init -y
npm install @modelcontextprotocol/sdk zod@3
npm install -D @types/node typescript
mkdir src && touch src/index.ts@modelcontextprotocol/sdk가 공식 TS SDK다. zod는 입력 스키마 정의용 — SDK가 zod 객체를 받아 JSON Schema로 변환해 spec의 inputSchema 자리에 넣는다.
package.json에 ESM과 빌드 스크립트를 추가한다.
{
  "type": "module",
  "bin": { "weather": "./build/index.js" },
  "scripts": { "build": "tsc && chmod 755 build/index.js" },
  "files": ["build"]
}tsconfig.json을 만든다.
{
  "compilerOptions": {
    "target": "ES2022",
    "module": "Node16",
    "moduleResolution": "Node16",
    "outDir": "./build",
    "rootDir": "./src",
    "strict": true,
    "esModuleInterop": true,
    "skipLibCheck": true,
    "forceConsistentCasingInFileNames": true
  },
  "include": ["src/**/*"]
}
기본 설정은 끝났다.
서버 인스턴스와 헬퍼
src/index.ts 위에 import와 서버 인스턴스를 둔다.
import { McpServer } from "@modelcontextprotocol/sdk/server/mcp.js";
import { StdioServerTransport } from "@modelcontextprotocol/sdk/server/stdio.js";
import { z } from "zod";

const NWS_API_BASE = "https://api.weather.gov";
const USER_AGENT = "weather-app/1.0";

const server = new McpServer({
  name: "weather",
  version: "1.0.0",
});McpServer가 4편에서 본 lifecycle을 알아서 처리한다. initialize 핸드셰이크, capability 협상, notifications/initialized까지 SDK가 자동이다. 우리가 채워야 할 건 어떤 도구를 노출할지뿐이다.
NWS API를 두 군데서 부르므로 헬퍼 하나를 둔다.
async function makeNWSRequest<T>(url: string): Promise<T | null> {
  const headers = { "User-Agent": USER_AGENT, Accept: "application/geo+json" };
  try {
    const response = await fetch(url, { headers });
    if (!response.ok) throw new Error(`HTTP ${response.status}`);
    return (await response.json()) as T;
  } catch (error) {
    console.error("Error making NWS request:", error);
    return null;
  }
}
stdio 서버에서는 console.log를 쓰면 안 된다. stdout으로 나가서 JSON-RPC 메시지에 섞이고 클라이언트가 파싱에 실패한다. 로그는 console.error로 stderr에 보내는 게 원칙이다.
Tool 등록 — get_alerts, get_forecast
2편에서 본 tools/list·tools/call이 코드에서는 server.registerTool 한 번이면 끝이다.
server.registerTool(
  "get_alerts",
  {
    description: "Get weather alerts for a state",
    inputSchema: {
      state: z.string().length(2)
        .describe("Two-letter state code (e.g. CA, NY)"),
    },
  },
  async ({ state }) => {
    const stateCode = state.toUpperCase();
    const url = `${NWS_API_BASE}/alerts?area=${stateCode}`;
    const data = await makeNWSRequest<AlertsResponse>(url);

    if (!data) {
      return { content: [{ type: "text", text: "Failed to retrieve alerts" }] };
    }
    const features = data.features ?? [];
    if (!features.length) {
      return { content: [{ type: "text", text: `No active alerts for ${stateCode}` }] };
    }
    const text = `Active alerts for ${stateCode}:\n\n${features.map(formatAlert).join("\n")}`;
    return { content: [{ type: "text", text }] };
  },
);
세 인자가 있다. 이름, 메타(description + inputSchema), 핸들러.
- name —
get_alerts. spec의 tool 이름 규칙(영숫자·_·-·.허용)을 따른다. - inputSchema — zod 객체로 정의. SDK가 JSON Schema로 변환해
tools/list응답에 넣는다. 클라이언트는 이걸 LLM 프롬프트에 넣어 모델이 인자를 만들도록 한다. - 핸들러 —
async ({ state }) => { ... }. zod 스키마로 검증된 인자가 그대로 들어온다. 반환값은 spec의content배열 형식이다.
get_forecast도 같은 패턴이다 — 위경도를 받아 NWS의 grid point → forecast 두 단계 조회를 묶어 텍스트로 돌려준다. 코드 길이만 좀 더 길 뿐 구조는 동일하다.
LLM 측 동작은 이렇게 흐른다.
sequenceDiagram
    participant LLM
    participant Client
    participant Server
    Client->>Server: tools/list
    Server-->>Client: [get_alerts, get_forecast]
    Note over LLM: 사용자: "캘리포니아 날씨 경보 알려줘"
    LLM->>Client: get_alerts({state: "CA"}) 호출 결정
    Client->>Server: tools/call (get_alerts, {state: "CA"})
    Server->>Server: NWS API 호출
    Server-->>Client: content: [{type: "text", text: "..."}]
    Client->>LLM: 결과 전달
    LLM-->>Client: 사용자 답변 생성
stdio 트랜스포트로 실행
registerTool이 끝났으면 마지막은 트랜스포트를 골라 connect만 하면 된다.
async function main() {
  const transport = new StdioServerTransport();
  await server.connect(transport);
  console.error("Weather MCP Server running on stdio");
}

main().catch((error) => {
  console.error("Fatal error:", error);
  process.exit(1);
});StdioServerTransport가 stdin·stdout을 잡아 6편에서 다룰 stdio 메시지 프레이밍(개행 구분)을 알아서 처리한다. 빌드해본다.
npm run buildbuild/index.js가 생성되면 준비 끝. 직접 실행하면 stdio가 떠 있긴 하지만 사용자 입력이 필요하니 무엇도 일어나지 않는다. 클라이언트에서 띄워야 한다.
Inspector로 동작 확인
Claude Desktop에 곧바로 붙이기 전에, 서버 단독으로 도구가 잘 보이는지 MCP Inspector에서 확인한다. Inspector는 클라이언트 역할을 대신해주는 디버깅 GUI다. 설치 없이 npx로 띄운다.
npx @modelcontextprotocol/inspector node ./build/index.js브라우저가 열리고, 서버에 자동으로 연결된 상태로 GUI가 뜬다.
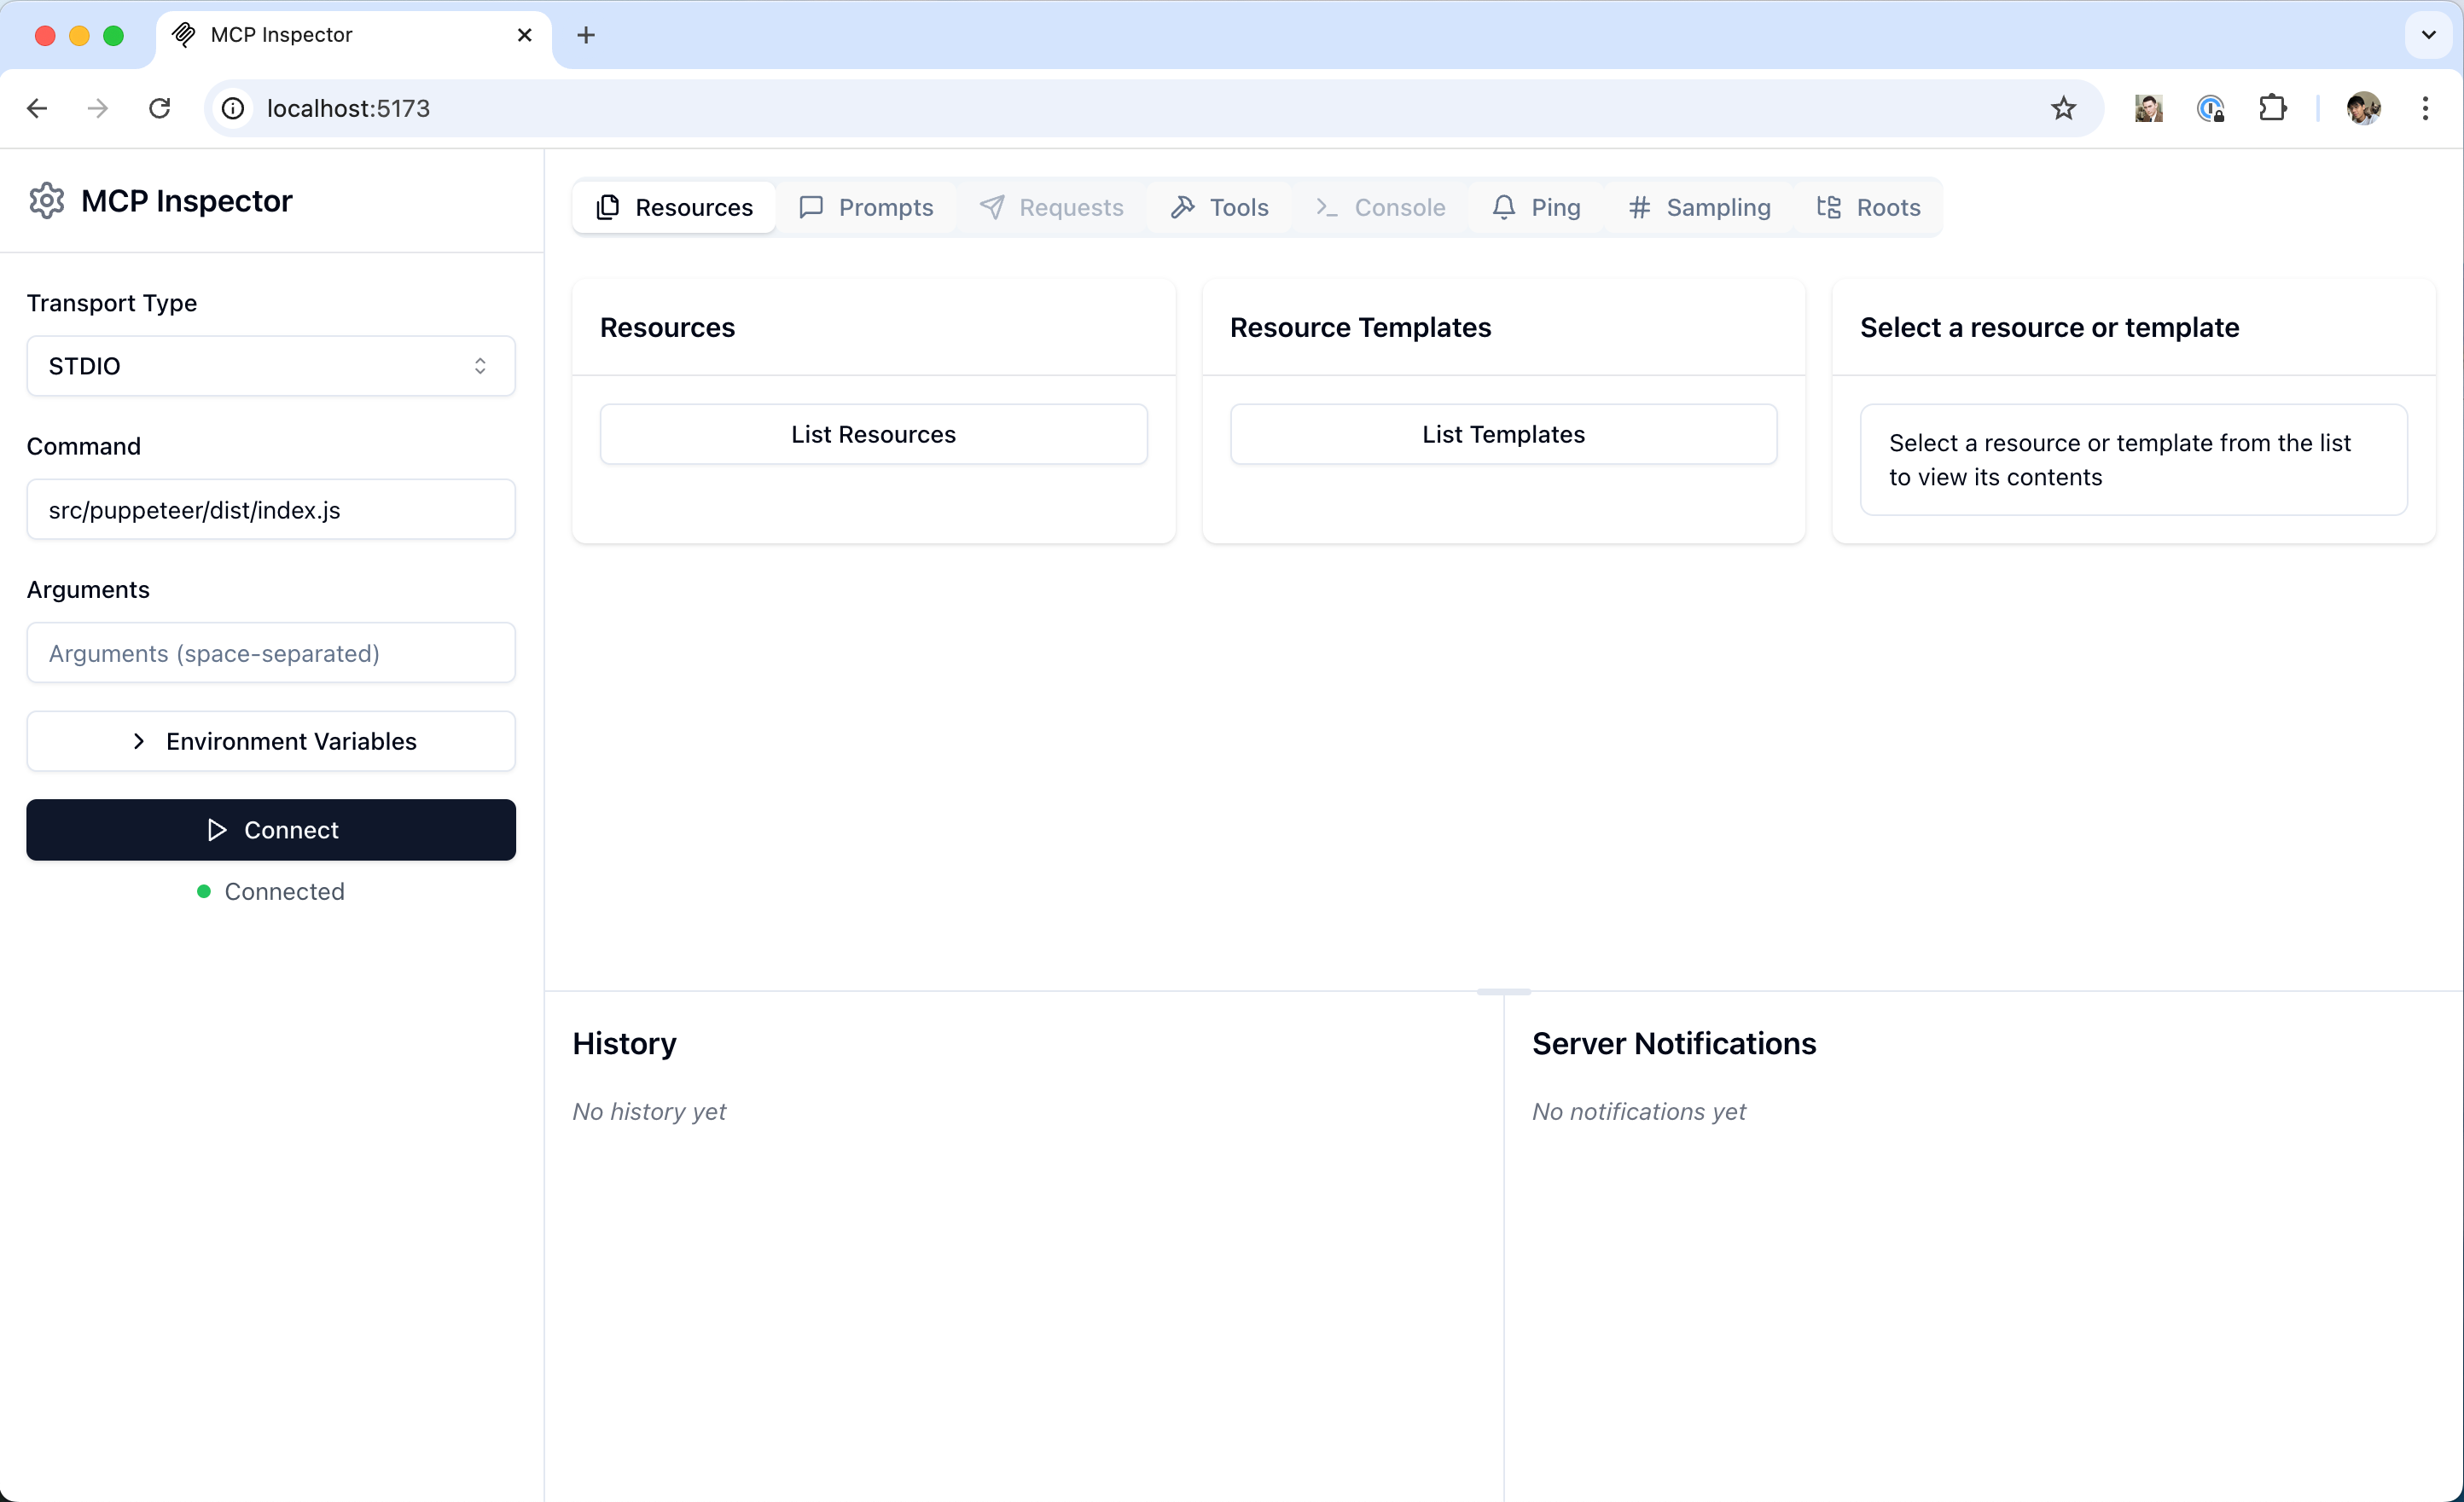
출처: Model Context Protocol — Inspector 공식 문서
탭이 자원·프롬프트·도구별로 갈려 있다. Tools 탭에 들어가면 서버가 노출한 get_alerts, get_forecast 두 개가 보이고, 인자를 입력해 직접 호출할 수 있다. 결과 콘텐츠와 응답 시간이 그대로 보인다. 호출이 실패하면 에러 응답을 그 자리에서 확인할 수 있어 코드 → 빌드 → 호스트 재시작보다 한 자릿수 빠른 피드백이 된다.
서버 capability도 별도 패널에서 보인다. 4편에서 본 tools.listChanged, resources.subscribe 같은 옵션이 어떻게 협상됐는지 한눈에 들어온다.
Claude Desktop에 연결
Inspector에서 동작이 확인됐으면 Claude Desktop에 붙인다. 설정 파일을 연다.
# macOS
code ~/Library/Application\ Support/Claude/claude_desktop_config.jsonmcpServers에 항목을 추가한다.
{
  "mcpServers": {
    "weather": {
      "command": "node",
      "args": ["/ABSOLUTE/PATH/TO/weather/build/index.js"]
    }
  }
}
경로는 절대 경로여야 한다. Claude Desktop을 재시작하면 자기 안에 weather 서버용 클라이언트 인스턴스 하나(1편의 그림)가 만들어지면서, 도구 메뉴에 망치 아이콘과 함께 두 도구가 보인다.
채팅창에 “Sacramento, CA 지역의 활성 기상 경보 좀 알려줘”라고 치면 Claude가 get_alerts를 골라 호출하고, 결과를 받아 답한다.
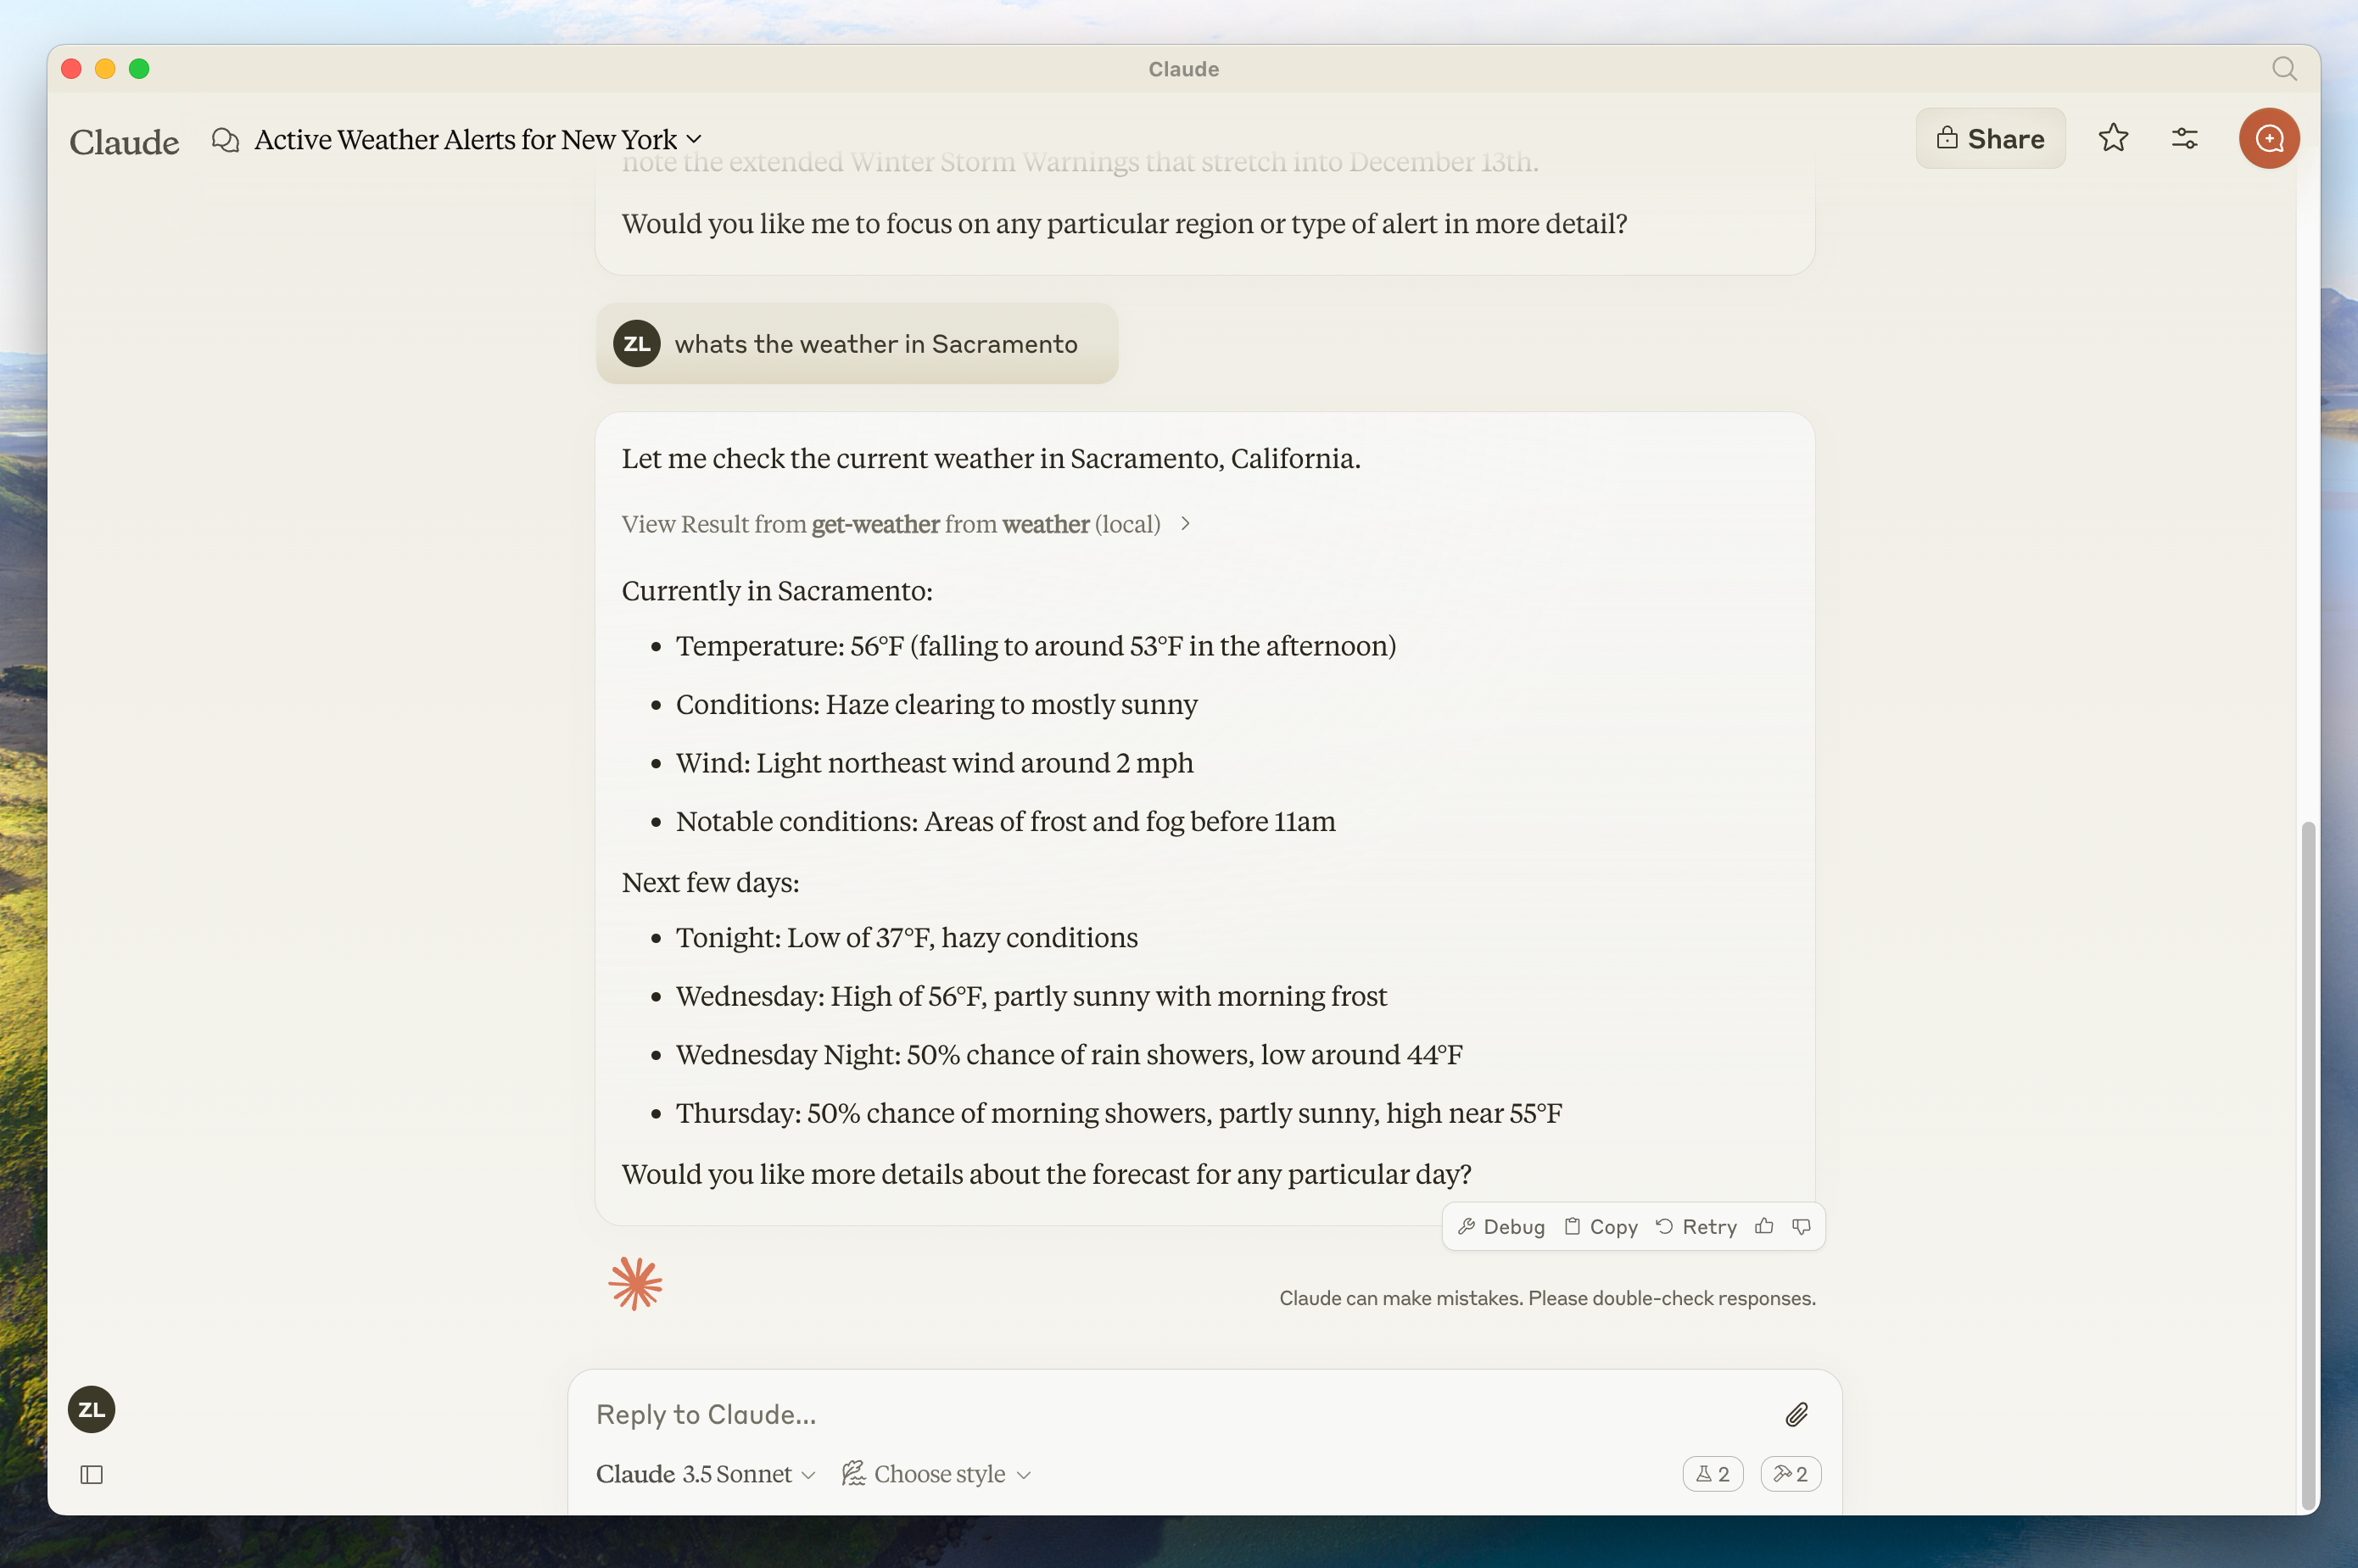
출처: Model Context Protocol — Build a Server 공식 quickstart
도구 호출 직전에 툴 호출을 허용할지 묻는 동의 화면이 뜬다 — 2편에서 spec이 “model-controlled tools에는 사용자 동의가 있어야 한다”고 강하게 권장한 부분이 호스트 UI에 그대로 나타난다.
한 사이클의 완성
코드는 100여 줄, 새 spec 지식은 거의 안 들어갔다. 그동안 1~4편에서 본 것들이 코드의 어디로 떨어지는지가 분명해진다.
| Spec 조각 | 코드 위치 |
|---|---|
initialize 핸드셰이크 | McpServer 생성자가 자동 처리 |
tools/list 카탈로그 | registerTool로 등록한 메타데이터 |
tools/call 호출 | registerTool의 핸들러 함수 |
inputSchema | zod 객체 → SDK가 JSON Schema로 변환 |
| stdio 트랜스포트 | StdioServerTransport() 한 줄 |
| capability 협상 | SDK가 자동, 우리는 도구를 등록한 것만으로 tools.listChanged: true가 자동 선언됨 |
여기서 한 칸 더 나가려면 원격에 띄우기다. stdio 대신 HTTP로 트랜스포트를 바꾸면 같은 서버를 SaaS로 굴릴 수 있고, 그러면 인증·세션 같은 새 관심사가 따라온다.
다음 편에서는 그 트랜스포트 차원을 깊이 본다. stdio가 어떻게 돌아가는지, Streamable HTTP가 무엇을 더 풀고 무엇을 새로 짊어지는지, 세션과 재개(resumability)는 어떤 모양인지 — 이번 편에서 한 줄(StdioServerTransport)로 처리한 것을 메시지 단위로 펼쳐본다.


Loading comments...